Ntfs-3g for Mac Os X El Capitan Download
1 of the frustrations of the dissever Mac and Windows world nosotros alive in is that the 2 giants both use different file systems. Microsoft prefers their own proprietary NTFS system on Windows, while Apple deploys its HFS+ on OS X.
The problem is that, out of the box, the 2 systems cannot "talk" to each other. While Macs can read files on NTFS drives, OS X cannot write to them by default. If you plug a NTFS-formatted drive into your Mac you lot'll run across your mouse cursor turning into an error sign if you try and drag a file onto it.
This can obviously pb to issues with regard to sharing files and file management, so the solution is to requite your Mac the power to write to NTFS.
Sadly, some of the near common methods broke with the contempo release of El Capitan, and so how can you set them? MakeUseOf investigates…
The Paid Options
There have always been premium options available to users who want NTFS drivers on their machines. Two of the most pop are Paragon NTFS and Tuxera – still, they come with drawbacks.
For example, older versions of Paragon recently stopped working on El Capitan, forcing users to pay for an upgrade and lumbering them with a time-consuming reinstallation process. Who knows what problems they might encounter with future Bone X releases? When volition Paragon decide that, once once more, users need to pay an upgrade fee to access their data?
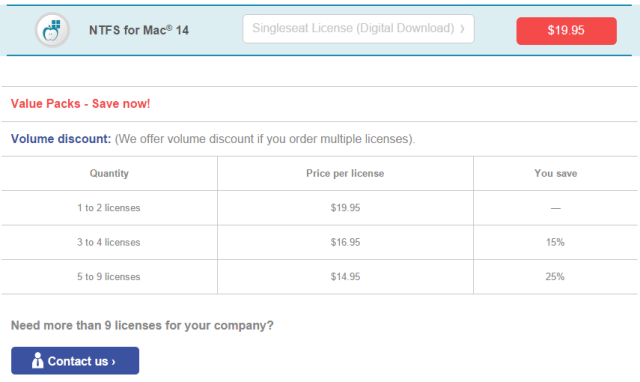
You lot also have to pay for each license yous crave. So while Paragon charge $xix.95 USD and Tuxera charge $31 USD for a single download, the toll tin quickly outset racking up if you need the drivers on multiple machines in your home or office.
Why non avoid the hassle and the toll past doing it for free?
Costless Method 1: Use the Terminal
It is a little-known fact that Macs actually do support writing to NTFS drives, but the feature is disabled by default. Granted, this method is not equally fast or equally straightforward as the second method which nosotros will come to presently, only it doesn't crave 3rd-party tools – a fact that will no doubt appeal to some users.
This method requires that you lot enable access on a per-volume basis – then if y'all take multiple NTFS drives you will need to repeat this process multiple times. The process works by editing the system's hidden fstab file, thus adjusting how your machine handles NTFS volumes later on they are plugged in.
Firstly, ensure that your external NTFS-formatted hard drive has a short and piece of cake to replicate proper noun – y'all're going to need to use it a lot and desire to keep things simple.
Side by side, navigate to Finder > Applications > Utilities and launch Final. Yous can also use Spotlight for this by strikingcmd+spacebar, typing "Terminal" then hittingenter.
In one case open up, type
sudo nano /etc/fstab and enter your password when prompted. You volition be presented with an editor window for the fstab file.
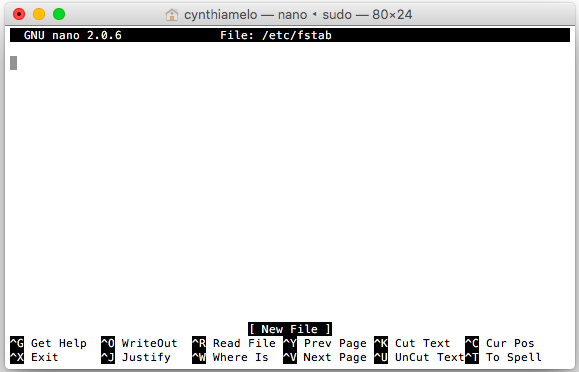
Type
Characterization=NAME none ntfs rw,car,nobrowse (making certain that you supercede
NAME with the name of your external drive) and press enter. Then press ctrl+o to save the file followed by ctrl+x to exit the editor window.
Next, eject your bulldoze so reconnect it. The drive will no longer show in Finder, simply can be accessed by returning to Last and entering
open /Volumes .
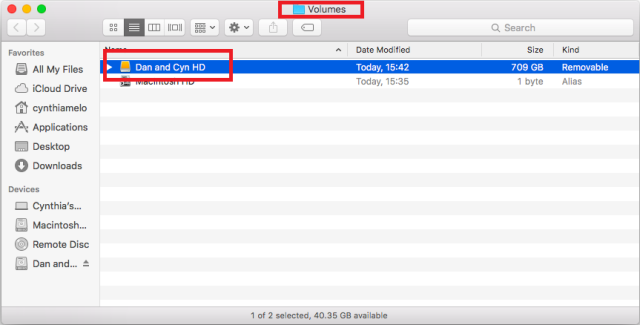
In the window that opens, you will be able view your bulldoze, besides as copy, edit, and drag files onto it. If you volition be using the drive regularly, you can ensure faster access by dragging it to the sidebar or making an allonym.
For this method you'll demand FUSE for OS 10, NTFS-3G, and fuse-expect; and you'll need to action a couple of terminal commands in Recovery Style.
The fox to making the process work on El Capitan is disabling the Arrangement Integrity Protection prior to installation. Failure to practise this will brand NTFS-3G neglect.
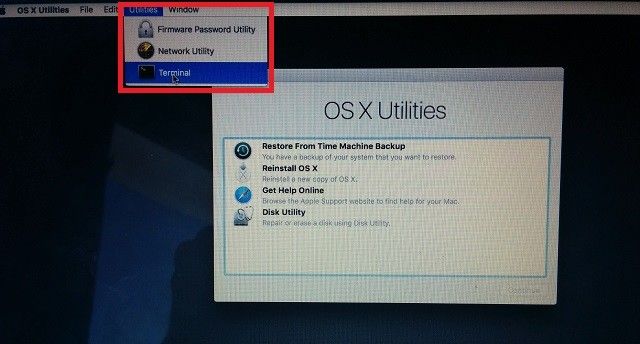
To do that, restart your organisation and hold down cmd+r while it reboots – information technology will offset the device in Recovery Way.
Adjacent, click on Utilities, open the Terminal, type
csrutil disable , printing Enter, and reboot the system.
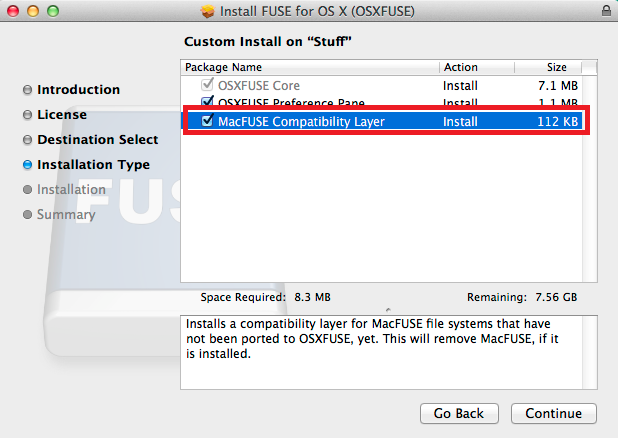
You can at present install the software. Showtime with FUSE for Os X – it is a necessary program for any Mac driver that deals with third-political party file systems. During the installation, make certain yous select the MacFUSE Compatibility Layer. If y'all don't install this layer, the next office of the process volition non work.
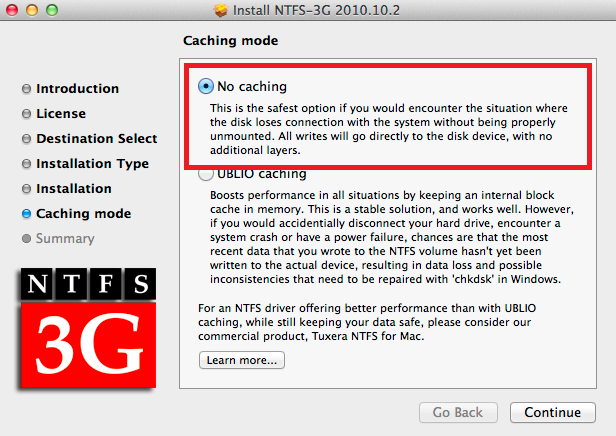
The next tool to install is NTFS-3G. This is the main component of the process and the software that will actually provide your Mac with the NTFS drivers.
When given the pick, make sure you select No caching rather than UBLIO caching.
One time the installation is complete, reboot your calculator. You might find you get a lot of on-screen warnings when your desktop loads back onto the screen, merely you can safely ignore them – they are caused past the fact the NTFS-3G software has not been updated by its developers in a long fourth dimension.
Finally, yous need to install fuse-await. This is the function of the procedure that volition remove those annoying pop-up error messages.
In one case this is all washed, yous'll demand to re-enable the System Integrity Protection. Boot your Mac into recovery mode, burn upwardly the terminal, and type
csrutil enable .
Reboot your motorcar one last fourth dimension, and voila, you now accept NTFS write capabilities on El Capitan.
Warnings
Exist aware that all iii methods listed in a higher place are unsupported by Apple, and as such might have adverse furnishings on your system. You might discover limitations, stumble beyond unknown "side-effects", or fifty-fifty damage your volumes.
Equally always, brand sure all your data is backed-up and secure before you try any of the changes listed.
Did it Piece of work for You?
What method did y'all cull? Did you manage to follow our instructions? Was it a success?
Leave a comment below with whatsoever problems you lot encountered. Either ourselves or your fellow readers might be able to help y'all!
Most The Author

Ntfs-3g for Mac Os X El Capitan Download
Posted by: jenningshises1959.blogspot.com


0 Comments